Friday, October 26, 2012

Stale Gluten Free Bread

Did you know that bread stales quickly in the refrigerator?  And since gluten free bread stales quickly anyway, it's even worse! This was one of my first hard gluten free lessons.  Two weeks after starting my new gluten free lifestyle, we had a family camping trip.  All my brothers and sisters and their families went to Bear Lake for the weekend.  I knew I had to plan ahead and take all my own foods.  I also knew I could not eat the only bread that was available at the grocery store. 

So I got out my wonderful new Bette Hagman cookbook and looked for a recipe.  I tried a bread recipe, and I was so pleased with how it tasted fresh from my oven, it almost tasted like bread!  So I quickly wrapped up all my new bread and stuck it in the cooler to go in the morning.  We got there at lunch time and I pulled out my bread to make a sandwich and it was AWFUL! How did something so yummy yesterday turn into something in-edible today?  And what on earth was I going to eat the whole weekend?

When I got my food science degree, I learned the answer to how.  The nearly freezing temperature in the fridge actually changes the structure of the starches in the bread.  We tend to put our gluten free bread in the fridge to keep it from molding, but by doing so, we rob ourselves of much of the flavor and texture.  If you are concerned about mold, you should freeze the bread, otherwise keep it on the counter and it will be fresh longer.

There are a couple tricks I learned when you are baking bread to help it stay fresh longer, and these are things you can do at home.  First, adding a citric or ascorbic acid will act as a preservative.  If you can't find citric acid at your cooking or health food store, you can get Fruit Fresh at the grocery store.  Just a teaspoon will help out a loaf of bread.  Also, pectin (like you make jam with) will help with the texture and crumb of the bread so it doesn't get as crumbly.  When the bread starts to get stale, heating it briefly in the microwave or a toaster with change the crystal structure in the starches and soften the bread.

But what to do when we forgot to stick that loaf of bread in the freezer and it's stale this morning?  I don't want to eat it, it just doesn't taste good, but I can't afford to waste it.  Here are a few things I like to do with my stale bread:
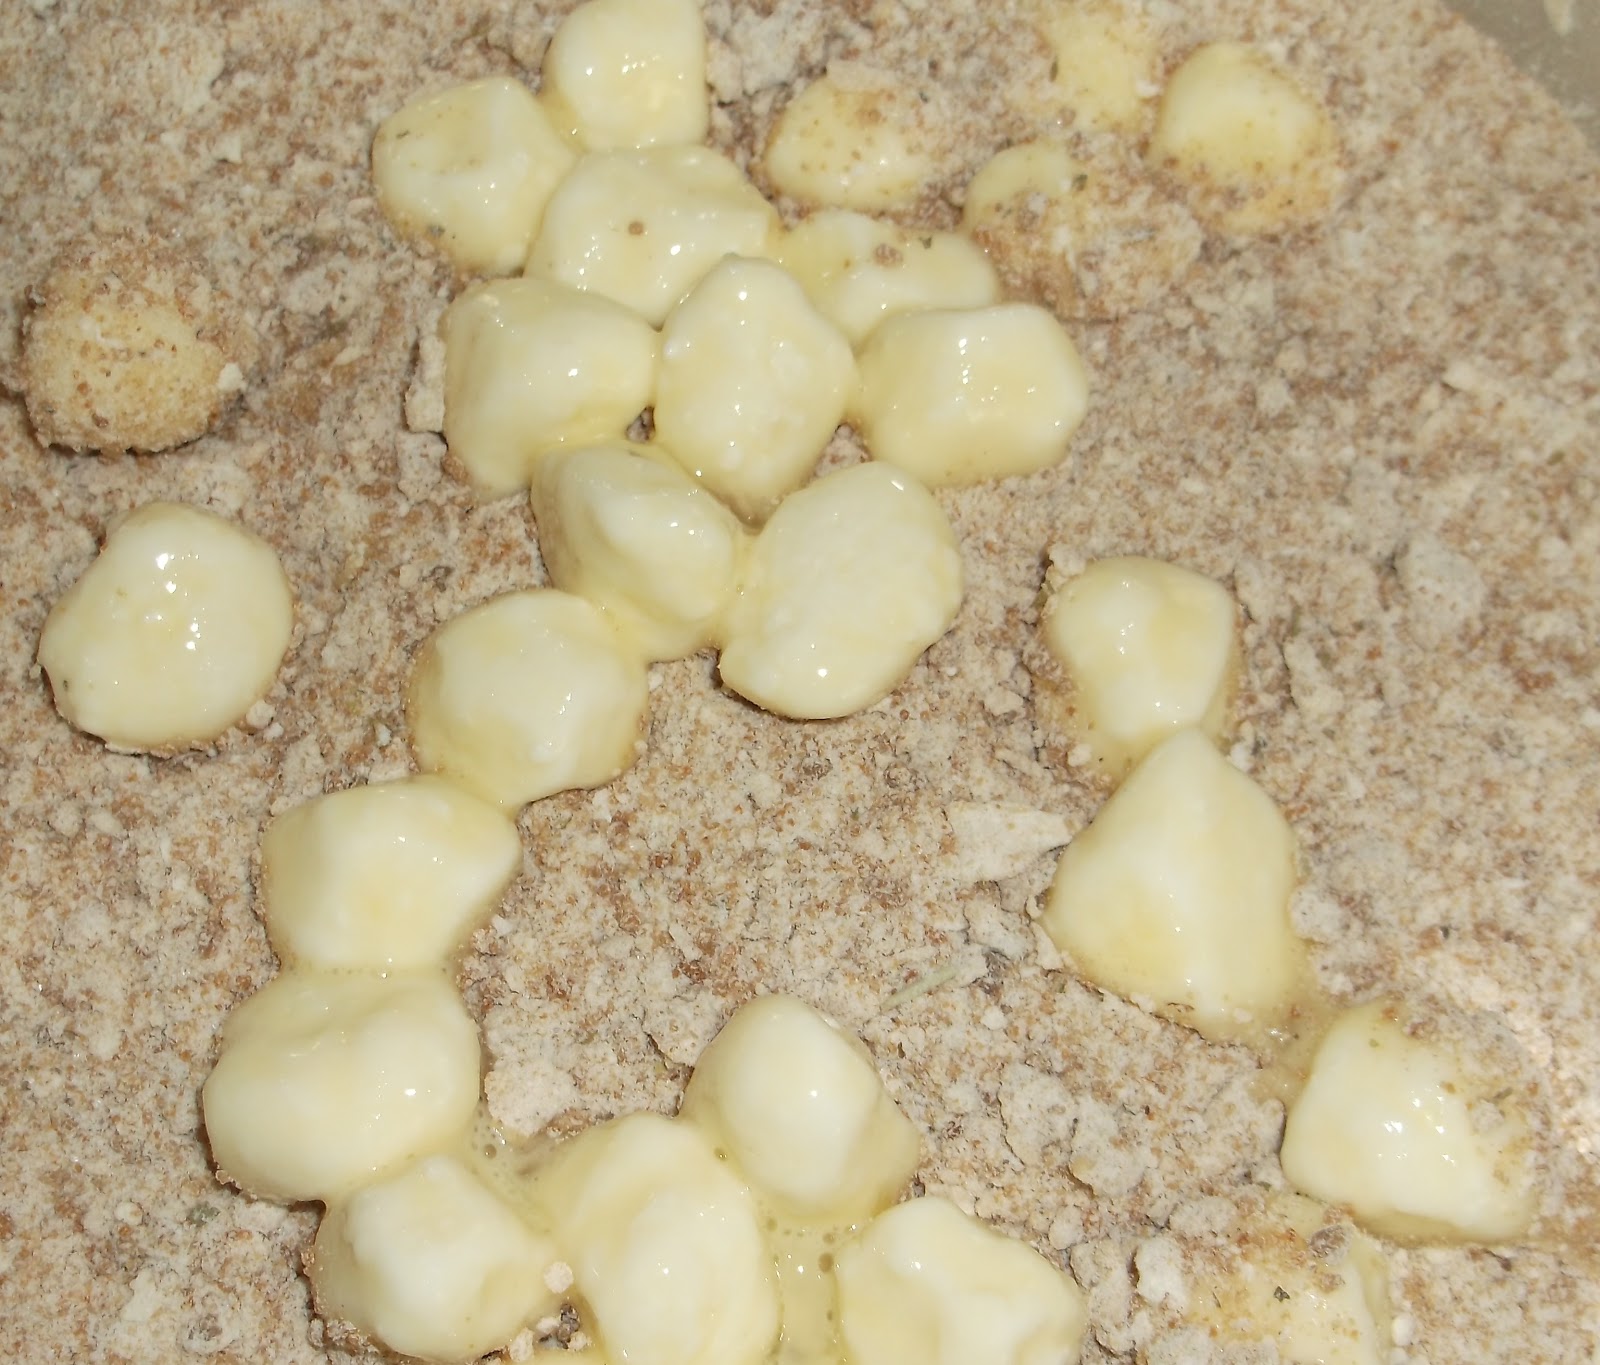
  1. Make bread crumbs for recipes.  To do this, coarsely chop up or break up the stale bread.  Spread it on a thin layer on a baking sheet and toast in your oven at 200 degrees.  Stir it often until all the bread is dried out and lightly brown.  Then, working in small batches, put it through the blender.  Sometimes you will need to dry them out a little longer in the oven after blending them.  Keep them in the freezer and you will always have bread crumbs for your mozzarella sticks
  2. Get ready for Thanksgiving stuffing.  When you have a few slices of stale bread, cut them into cubes and toast them in the oven at 200 until they are dried out.  Keep them in the freezer and add to them and you will have your bread cubes for Thanksgiving
  3. French toast!  Stale bread makes great french toast.  Slice it thin, dip in egg and fry it up.  This is a treat I wasn't allowing myself gluten free because I wanted to save the bread for other things, but a french toast dinner is a great way to use up stale gluten free bread.
  4. Bread pudding, croutons or even fondu are other great ways to use your stale bread so that it does not go to waste
This time of year, my stale bread is working toward being part of Thanksgiving dinner.  If you plan ahead, and make your bread cubes over the weeks before Thanksgiving you won't have to shell out for or bake fresh bread just to make dried out cubes with it!


Wednesday, October 24, 2012

Gluten Free Mozzarella Sticks

I took my oldest son out a couple weeks ago to celebrate his 15th birthday.  He ordered mozzarella sticks with his dinner.  I sat there the whole time smelling them and sighing, I couldn't even taste my gluten free steak, my mouth wanted those mozzarella sticks!


They were always my favorite appetizer, the only one I would order at restaurants and I almost always served them at parties.  After dinner with my son, I just had to have some again!  And in fact they turned out so well, I have had them several times since then.  They actually work better if I freeze them, so I made some big batches that I can grab a few out and fry when the mood hits me.

I used to try to avoid fried foods, and always eat low fat.  I only ate fried foods as a special treat when eating out, but since my diagnosis, I can't eat them out anymore, so I've started making some of them at home.  I give myself permission to eat something, as long as it's gluten free, if I'm really craving it.  There are enough things in this world that I can't eat, I don't want to say no to anything I can!  As long as I don't eat donuts, fried chicken and mozzarella sticks every day, it's okay.

Today at the store I found these cute little mozzarella pearls
 I decided to use them instead of the traditional sticks.  I told my kids they were mozzarella bites, and my youngest kept mispronouncing them "Monsterella Bites" Since we are only a week from Halloween, that works works for me!  A great snack at your Halloween party and they seem to go further.  My kids were happy eating 5 or 10 of these tiny bites.

(printable recipe)

1 lb Fresh mozzarella cut into sticks
2 large eggs
¼ cup milk
1 ½ cup Gluten Free Bisquick
1 cup finely ground bread crumbs
1-2 teaspoons Italian seasoning
Oil or shortening for frying

Put ½ cup Bisquick into a large plastic bag

Combine the rest of the Bisquick with the bread crumbs and Italian seasoning in a large, deep dish.

Put the cut mozzarella sticks into the bag and gently toss until coated (if you are using low moisture mozzarella dip it in the milk first).

Remove the sticks from the Bisquick and place them in a container with a tightly fitting lid (Tupperware works great).  Pour the milk over the stick, put the lid on the container and turn upside down and back a couple times until they are all wet.

Take the sticks out of the milk and put them back in the flour back, tossing again to coat.  
Discard all but about 2 Tablespoons of the milk and then beat the eggs into the milk.  Remove the sticks from the bag and dip them into the egg mixture then put them in the bread crumbs.  When there are several sticks in the bread crumbs they can be tossed gently back and forth until coated.
Fry in HOT oil in small batches, about 375 degrees for 1-2 minutes, until the cheese starts to leak out. 
Serve hot with your favorite marinara sauce.
*Most home use deep fat fryers do not go that high, so it is best to use a frying pan on the stove.  Only fry a few at a time, you need to put them in and remove them quickly.  If you have a metal basket to put them in and take them out with it works best.


Gluten Free Savoy Cake (a classic french sponge cake recreated)


I have been reading a great book...okay so it's a cook book, but not any ordinary cook book!  A few days ago I was reading an old novel and in a dinner scene, it said they had Savoy Cake for dessert.  What is Savoy Cake?

So I Googled it!  I found this wonderful post by David Lebovitz for Gateau de Savoie.  Now, of course, this cake is not gluten free, but it sure looks YUMMY!  As I read the post, I was filled with a desire to read the book The Auberge of the Flowering Hearth (and to eat the cake!).  Since it was reasonably priced as a used book on Amazon, I took the plunge and bought it.  This book has the same tone as some of my favorite foodie blogs and shares a passion for food that I can relate to.  So now I feel inspired to share my passion and what I have learned in this crazy journey down the gluten free life path.

I did successfully convert the Savoy Cake to gluten free, and changed it about to suit my tastes.  We have been on a lime kick lately so I added lime zest and well, everything is better with whipped cream, so, while it is not as traditional, I did top it with whipped cream and fruit. This cake was so soft and tender, I couldn't believe it!  Don't be put off by the directions, they may seem a bit complicated, but are not that hard or time consuming.  I'm at a higher altitude so had to cook it an additional 10 minutes.
(printable recipe)


One 10-inch (27cm) cake, twelve to sixteen servings

Adapted from Gâteau de Savoie by David Lebovitz
6 large eggs, separated
1 1/2 cups (200g) powdered sugar
1/4 cup (60ml) boiling water
1 1/2 teaspoons vanilla extract
1/2 teaspoon salt
1/4 teaspoon cream of tartar
1 cup gluten free cake flour
*Cake flour recipe  2/3 cup superfine white rice flour  1/3 cup potato starch 1/3 cup tapioca starch ½  Tablespoon xanthan gum ½  Tablespoon psyllium husk
optional: Zest of one lime or lemon.  For a fruitier flavor you can use the juice of the lime in place of the boiling water.
Cooking Spray and additional powdered sugar for preparing the pan
1. Zest and juice the lime or lemon and set aside
2. oil a 10-inch (27cm) bundt pan and dust the inside with powdered sugar, then tap out any excess.
3. Preheat the oven to 300ºF (150ºC.)
 
4. In the bowl of a stand mixer, stir together the egg yolks with the sugar. Whip the yolks on high speed until thick and lightened in color. With the mixer running on high speed, dribble in the very hot water (or juice), a few teaspoons at a time, then add the vanilla. Continue whipping until the mixture has re-thickened and resembles soft pudding, holding its shape when you lift the whip.
 
5. In a separate bowl, whip the egg whites with the salt and cream of tartar until they hold stiff peaks.

I don't have a separate mixer bowl, so I quickly scraped the yolk mixture into another mixing bowl and washed the mixer bowl and beaters.  If you do this, make sure it is completely clean, if there is fat from the yolks the whites won't peak.

6. Put the cake flour in a mesh strainer or sifter, and sprinkle the flour over the yolks, folding it into the yolks gradually as you sift.
 
7. Stir in the Lime zest then fold in one-third of the beaten egg whites until fully incorporated. Then fold in the remaining egg whites.

8. Scrape the batter into the prepared pan and bake for 1 hour. It’s done when a toothpick inserted into the center comes out clean, with perhaps just a few crumbs attached.
Remove from oven and immediately turn the cake out onto a wire cooling rack. Let cool completely before slicing.
*Serve with fruit and or whipped cream


Tuesday, October 23, 2012

Gluten Free Bread Bowls!


I have really missed having bread bowls when I make soup in the fall since going gluten free.  We all know that gluten free bread rises out more than up, so bread bowls just don't work.  Today I had an epiphany and they turned out great!  You can use my recipe, or your own favorite gluten free recipe or mix.
Gluten Free Soup bowls  (printable recipe)
                                                Flour blend
 ½ cup sorghum flour
1 cup brown rice flour
 ½ cup Sweet rice flour
 ½ cup Expandex Modified Tapioca starch
 1/3 cup dry milk powder
2 Tablespoon whole grain corn flour
 ½ cup Potato starch
2 Tablespoon yeast
 ¼ cup hi-maize Corn Fiber
1 ½ teaspoon salt
                                                WET INGREDIENTS
 ¼ cup butter melted
 2 eggs + 1 egg yolk
2 ½ cup Plus 2 Tablespoons warm water
1/8  cup sugar
3 Tablespoon whole psyllium husk
1 Tablespoon + 1 teaspoon xanthan gum

A few quick notes before we begin:
·         I like using the modified tapioca starch, but if it is not available or you prefer not to use it, you can substitute normal tapioca starch. 
·         The Hi-Maize is a wonderful product, you can get it from King Arthur Flour, it is a resistant starch, so it acts like corn starch in the bread, but it acts like fiber in your body.   If you can’t get it, or don’t want to use it, substitute corn starch.
·         For the corn flour, I like Bob’s Red mill, whole grain stone ground corn flour.  Don’t use corn meal it is simply too coarse.
·         The psyllium husk is available at your local health food store.  It makes the dough more elastic and the final bread much better, plus it adds fiber.

In a large glass measuring cup, measure out the warm water.  Stir in the yeast, sugar, Psyllium Husk, and xanthan gum.  Set aside to proof.

Measure out all the flour blend ingredients and put the bowl of your mixer.  Turn the mixer on to blend the dry ingredients, and then remove about one cup of the flour blend and set aside.

Add the eggs and the butter to the water/yeast solution.  Turn the mixer on low and pour the liquid solution into the flour mixture.  Once the liquid has all been added and is incorporated, turn the speed up to high and mix for 2-3 minutes.  It will be very wet and sticky at this point.  Add the flour mixture you set aside earlier.  Mix for an additional 2 minutes. 
 
Normally with gluten free dough, we only use a single rise method but I wanted a stronger yeasty flavor.  I left the dough in the mixer bowl and covered it for about 45 minutes to proof.  Then I quickly turned the mixer on to “punch down” the dough. 

Oil the inside of 4 oven safe bowls.  I used my Corel cereal bowls.  You could also use mini crocks or casseroles that are about that size.  Because gluten free dough is so soft and spreads out, you need to bake it in a dish to get the bowl form now evenly divide the dough into the 4 dishes and smooth the tops with damp hands.  Lightly brush the tops with melted butter or oil.  Yeast dough will rise best in a warm, moist environment.  An easy way to create that is to turn your oven onto warm for a few minutes and then turn it off.  Then place a shallow pan in the bottom of the oven and pour a cup or two of boiling water into it.  Place the bread bowls in the oven and close the door.  Allow to rise until nearly double (only 30-45 minutes).
 
Turn the oven on to 350 degrees and bake for 35-45 minutes until nicely golden brown on top.  Remove from oven and immediately remove from bowls to cool.  Brush tops with butter or spray with cooking spray to soften.


 To serve, cut the top out by running a small serrated knife around ½ an inch from the outside edge.  Make sure not to cut down too far and make a hole in the bottom.  Use a spoon and gently pull up the plug of roll.  You can use to spoon to clear out more roll, but make sure to leave at least ¼ inch on bottom and sides.  Fill with soup and serve with the removed bread on the side.

Cheese Soup, gluten free with carrots, peas and potatoes

I woke up this morning to cold rain, dark skies and wind.  There were snowflakes mixing with the rain.  It is soup weather!  I felt like welcoming fall.  There’s nothing better than hot soup, hot fresh bread and warm apple cider on a cold, wet fall day.

When I was young, I thought I hated soup, and I still hate the soup that comes out of a can.  As an adult I have learned to love a thick hearty soup or stew loaded with veggies and flavor.  My mom used to make a cheese chowder, potatoes and onions in a cream soup base with cheddar cheese.  I got married and moved away and started cooking for my own family.  A sweet old lady in my new neighborhood taught me how to make her cheese soup.  It’s really a thick chowder, but she called it soup and I’ve stuck with it.

Over the years, I’ve changed and adapted the recipe to meet my family’s tastes and my goals in cooking.  One of the things I feel strongly about in a soup or stew is vegetables.  When I make soup for dinner, I don’t want to also make a plate of veggies.  I want to feel like my family is getting good nutrition with their good flavor and I’d prefer not to wash any extra dishes!  I also love color.  I think food should look good as well as taste good and smell good and be good for you.
I like to make a big crock full and freeze the extra so that I have a handy dinner for a crazy day.  It’s easy to scale it down to a smaller batch if this is too much for you, just use proportions.  I like to dice my veggies fairly small, that way I can have a bit of everything in every bite.
(printable recipe)
Image
First spray the inside of the crock pot with Non-Stick spray to make clean up easier
6-8 Medium potatoes peeled and diced.  (This will fill not quite half my crock pot.)
2 lbs of Carrots, peeled and diced. (about ¼ of my crock pot)
10-15 stalks of celery diced. (about the same amount as the carrots)
1 onion, finely diced
1-2 Tablespoons salt to taste
1-2 teaspoons to taste

Add chicken broth to fill the pot halfway.  I like to use Better Than Bullion in place of canned broth or stock, it lets me adjust the flavor to my taste and is gluten free.  I use 1-2 Tablespoons and 2-3 cups water.

Put the lid on the crock and turn the pot on low if you are cooking it all day, high if you need it done sooner.  It will take 5-6 hours on high.

When the vegetables are tender, 30-60 minutes before serving, combine 1/3 cup Clear Jel (Modified corn starch) with about 2 cups of milk, stir well and then stir into the vegetables.  Stir it for a few minutes and when it has thickened you can adjust the thickness by adding more Clear Jel to make it thicker or plain milk to thin it out.   Remember when adding milk that you will still be putting in cheese and peas and leave yourself room.

*note- I use Clear Jel because it doesn’t separate out and get lumpy when it’s refrigerated or frozen.  You can usually find it at kitchen stores and you can buy it online.  There are different forms, I prefer the regular Clear Jel over the instant for this application.
Image
Image
10 Minutes before serving stir in about 12 oz shredded cheddar cheese.  Keep a little out to garnish bowls with.  Right before serving, stir in one small bag of frozen peas.  The peas will cook without getting mushy and they will bring the temperature of the soup down to eat immediately.  Top with a small dollop of sour cream and some bacon crumbles and cheese and enjoy!
Image 
While the soup was cooking, I remembered the bread bowls my mom used to serve the cheese chowder in, and I was wishing I had some gluten free, so I decided to tackle it, and as you can see, they came out great, so I will post the recipe!